
While there will always be a time and place for furniture and home décor from Kmart and IKEA, designer pieces can help you add flair and make your space truly unique. But, unless you score second-hand finds on Gumtree or Facebook Marketplace for a bargain price, you’re likely going to have to shell out big bucks for quality, limited-batch homewares.
That said, if it’s a cabinet with a textured, abstract artwork finish you’re after, you’re in luck. We’ve got DIY instructions for one, created by Australian DIY queen Jaharn Quinn and made to replicate the look of one from interior design studio Akuko Atelier, here.

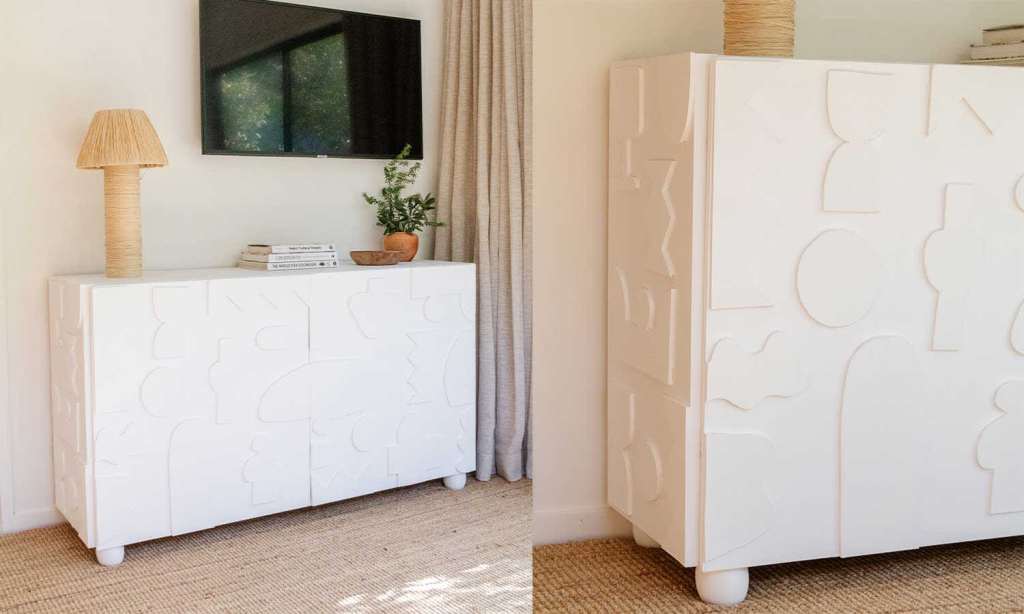
“When I came across a beautiful abstract cabinet made by @atelierakuko, I instantly fell in in love with it and knew I had to recreate it for our guest bedroom makeover,” Quinn wrote alongside an Instagram post showing the process. “As luck would have it, I had recently bought a cube storage unit from @bunnings and I started to wonder if I could turn it into a cabinet.”
Quinn continued, saying that though the cabinet project had a lot of DIY elements she’d never done before, including installing hinges and furniture legs and drawing and cutting abstract shapes, she didn’t let that stop her from working on it.
“I love thinking [about] how I can make something myself. I love breaking down the process step-by-step, problem-solving along the way and overcoming obstacles while sharing the materials I used so you can make these projects yourself with lots of ease.”

Ahead, Quinn shares what that process, along with the materials you need for it, is. But before you begin, have a look at the video Quinn shared of the setup. Because while the sheer amount of materials needed and steps to take may seem overwhelming, they’re a little so after watching how it’s done. Plus, when it comes to the materials, it’s a one-stop-shop ’cause everything you need is all at Bunnings.
View this post on Instagram
You Will Need
- Flexi Storage Clever Cube 76 x 39 x 146cm 2 x 4 Storage Unit – White, $95.00
- 2440 x 1220 mm 3mm Melamine White MDF, $32.70 – Cut to size to enclose the back of the cabinet
- Trojan 3 in 1 Heavy Duty Staple Gun Set, $19.99
- 1200 x 897mm 7mm Plywood Pine Premium BC Grade, $35.15 – Cut to size for the two cabinet doors using Bunnings cutting service
- 2x Kaboodle Soft Close Door Hinge – 1 Pair, $17.40
- 1x Craftright Carpenters Pencil with Sharpener, $4.99
- 4x Adoored 70mm Pine Ball Furniture Leg, $6.40
- Selleys Liquid Nails 80g Clear Construction Adhesive, $11.49
- ScotchBlue 24mm x 55m Original Multi-Surface Painter’s Masking Tape, $7.85
- Zinsser 470ml B-I-N Primer Sealer Stain Killer, $29.45
- Dulux 1L Exterior Paint Weathershield Low Sheen Lexicon Quarter, $46.90
- Ryobi 18V ONE+ Home Essentials Kit, $169.00 – Kit includes a drill, hammer, screwdriver and measuring tape, which will be required for this project
- XUI 350W Jigsaw, $29.98
- XU1 125W Detail Sander, $29.98
- Clamps
- Paint Rollers
- Paint Tray
- Paint Brushes
How to Make a Textured Cabinet
- Begin by assembling the cube storage, following the instructions on the product’s page on the Bunnings site.
- Measure the width and height of the cabinet and divide this by two to get the measurements for the two cabinet doors. As mentioned in the materials needed, have your cabinet doors and plywood cut to size at the store.
- Attach the melamine MDF (white side facing in) to the back of the storage cube using the staple gun.
- Paint the cabinet doors. Once dry, then lift the storage cube onto your work surface placing it on its side.
- Attach the hinges to the storage cube and cabinet doors using these instructions from Bunnings. *Please note the cabinet doors used in this video already have a hole cut out in them.
- Use a pencil to mark where you need to cut a hole.
- Use a drill to make lots of small holes, then use a hammer to bang the plywood out.
- Use a screwdriver to lift or drop the doors down, pulling them left or right where/if necessary. By this point, the basic structure of your cabinet should be in place.
- Attach the furniture legs onto the underside of your new cabinet using a drill. If you find the legs are a little loose, use Liquid Nails and let it dry overnight.
- Using a pen, draw the outline of a range of various abstract shapes and cut them out using a jigsaw. Smooth the edges down using a sander.
- Position the abstract shapes onto the cabinet and glue them down using Liquid Nails. The shapes may slip on the sides of the cabinet so use painters’ tape to hold them into place, and let the glue dry overnight.
- Once the glue has dried, paint the furniture legs before standing the cabinet upright.
- Paint the cabinet doors, ensuring you apply multiple coats to hide the MDF.
- While the paint is drying, apply one coat of Zinsser B-I-N Primer Sealer to the sides and top of the cabinet.
- Once dried, apply a couple of coats of white paint and set aside to dry.
Read more stories from The Latch and subscribe to our email newsletter.